Setting Up the Gumnut MCP Server
This guide walks you through configuring the Gumnut MCP server in popular AI tools.Prerequisites
- A Gumnut account
- An MCP-compatible tool
Server URL
The Gumnut MCP server is available at:Claude Code
Claude Code supports MCP servers natively through CLI commands or configuration files. When you connect, you’ll be prompted to authenticate with your Gumnut account via OAuth.Using the CLI (Recommended)
Add the Gumnut MCP server with a single command:--scope user flag:
Using JSON Configuration
Alternatively, add the configuration directly to your~/.claude.json file:
.mcp.json file in your project root with the same structure.
You can also authenticate with an API key instead of OAuth by adding an Or in JSON configuration:
Authorization header:Verify Installation
Check that the server is configured:/mcp command within Claude Code to see available servers and their tools.
Cursor
Cursor supports MCP servers through JSON configuration files. When you connect, you’ll be prompted to authenticate with your Gumnut account via OAuth.Configuration File Location
- Global (all projects):
~/.cursor/mcp.json - Project-specific:
.cursor/mcp.jsonin your project root
Configuration
Create or edit the configuration file:Using Cursor Settings UI
- Open Cursor and go to File > Preferences > Cursor Settings
- Select the MCP tab
- Click Add Server
- Enter the server details:
- Name:
gumnut - URL:
https://api.gumnut.ai/mcp - Transport:
http
- Name:
You can also authenticate with an API key instead of OAuth by adding an
Authorization header to the configuration:Verify Installation
After configuration, go to Cursor Settings > MCP to seegumnut listed as a registered server. Click refresh if needed.
Claude Web (claude.ai)
Claude on the web supports remote MCP servers through the Integrations feature.MCP integrations on Claude.ai require a paid plan (Pro, Max, Team, or Enterprise). Free accounts cannot connect to MCP servers—use Claude Code or Claude Desktop instead.
Setup Steps
- Go to claude.ai and sign in
- Click Customize then Connectors (or go directly to claude.ai/customize/connectors)
- Click + to add a new connector
- Enter the Gumnut MCP server URL:
- You’ll be prompted to authenticate with your Gumnut account via OAuth
- Save the connector
Using the Integration
Once configured, you can ask Claude to interact with your Gumnut library directly in chat:ChatGPT
ChatGPT supports MCP servers through custom apps.Gumnut will be added to the ChatGPT app store in the near future. In the meantime, you can connect manually using developer mode.
Setup Steps
- Open ChatGPT and go to Settings > Apps (or go directly to chatgpt.com/#settings/Connectors)
- Enable Developer mode
- Click Create app
-
Configure the app:
- Name:
Gumnut - Server URL:
https://api.gumnut.ai/mcp
- Name:
-
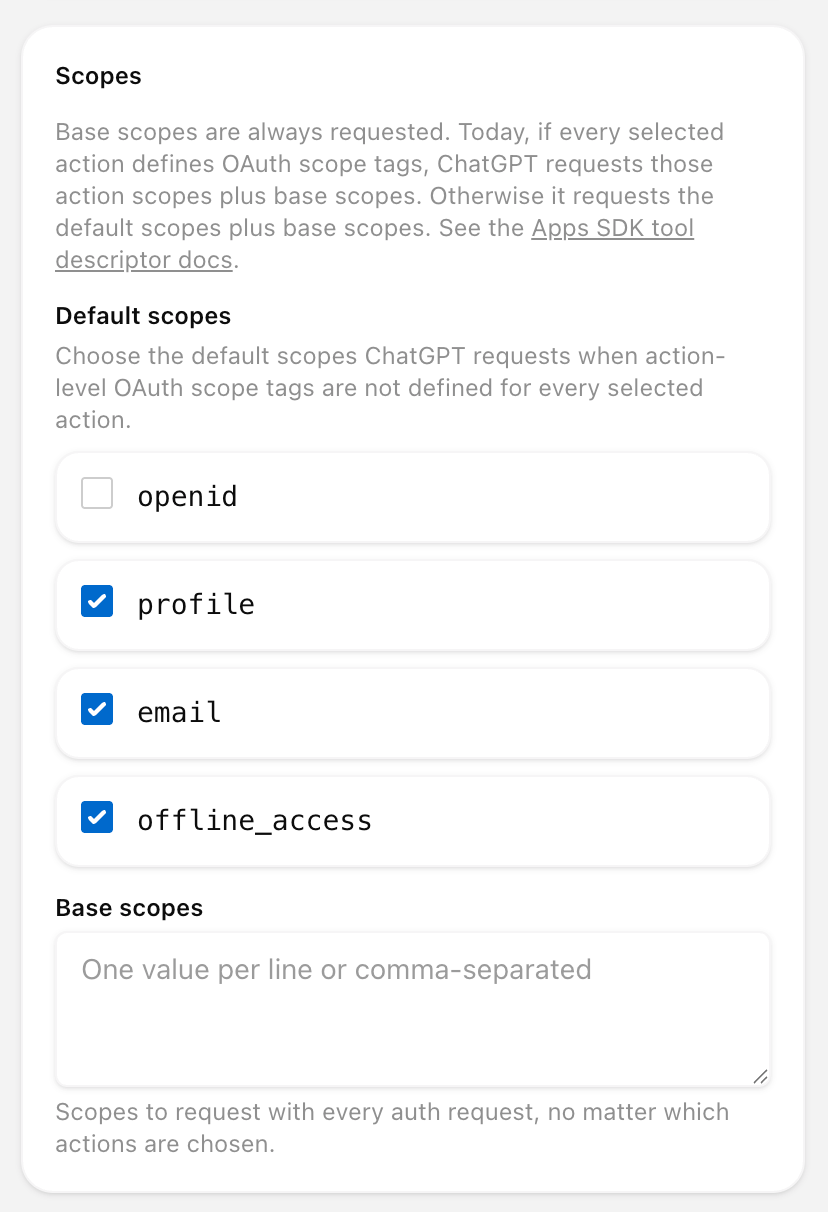
Expand Advanced settings. Under OpenID support, leave OIDC enabled unchecked, and under Default scopes, make sure
openidis not selected (profile,email, andoffline_accesscan stay selected).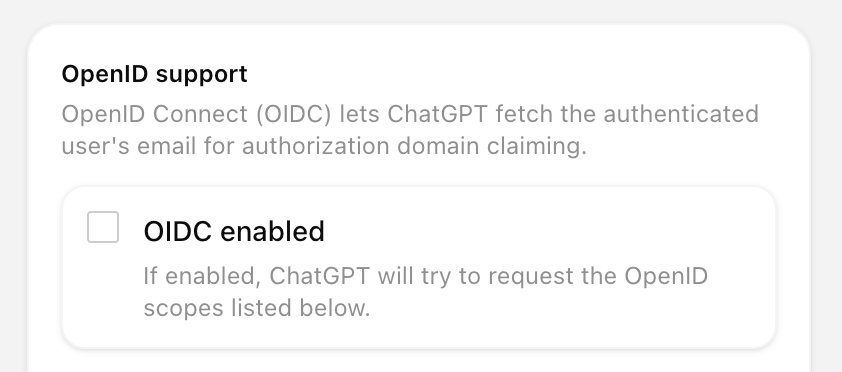
- You’ll be prompted to authenticate with your Gumnut account via OAuth
- Save the app