> ## Documentation Index
> Fetch the complete documentation index at: https://docs.gumnut.ai/llms.txt
> Use this file to discover all available pages before exploring further.
# MCP Setup
> Configure Gumnut MCP server in Claude Code, Cursor, ChatGPT, and Claude Web
# Setting Up the Gumnut MCP Server
This guide walks you through configuring the Gumnut MCP server in popular AI tools.
## Prerequisites
1. A Gumnut account
2. An MCP-compatible tool
## Any MCP client
Gumnut runs a standard remote MCP server over HTTP, so a client that supports remote MCP servers can connect to it — provided it can also authenticate. Every request to the server carries your Gumnut credentials, so remote transport on its own isn't enough: your client needs to support either the MCP OAuth flow or configurable request headers.
The tools below have step-by-step instructions because they're the ones people ask about most, not because they're the only ones that work.
To connect a client that isn't listed, you need two things.
**The server URL:**
```text theme={null}
https://api.gumnut.ai/mcp
```
**Authentication**, in one of two forms:
* **OAuth** — if your client can sign in to remote MCP servers, point it at the URL and it will open a browser window to authorize your Gumnut account. Nothing else to configure.
* **An [API key](/guides/authentication/api-keys)** — if your client can't do OAuth, or the sign-in flow gives you trouble, send the key as an `Authorization` header instead.
Most clients configure servers with JSON in roughly this shape:
```json theme={null}
{
"mcpServers": {
"gumnut": {
"url": "https://api.gumnut.ai/mcp",
"headers": {
"Authorization": "Bearer apikey_YOUR_API_KEY"
}
}
}
}
```
Drop the `headers` block if you're using OAuth. The exact keys vary between clients — some want an explicit transport field such as `"type": "http"` or `"transport": "http"` alongside the URL — so check your client's documentation for its spelling.
## Claude Code
Claude Code supports MCP servers natively through CLI commands or configuration files. When you connect, you'll be prompted to authenticate with your Gumnut account via OAuth.
### Using the CLI (Recommended)
Add the Gumnut MCP server with a single command:
```bash theme={null}
claude mcp add --transport http gumnut https://api.gumnut.ai/mcp
```
To make it available across all projects, add the `--scope user` flag:
```bash theme={null}
claude mcp add --transport http gumnut https://api.gumnut.ai/mcp --scope user
```
### Using JSON Configuration
Alternatively, add the configuration directly to your `~/.claude.json` file:
```json theme={null}
{
"mcpServers": {
"gumnut": {
"type": "http",
"url": "https://api.gumnut.ai/mcp"
}
}
}
```
For project-specific configuration, create a `.mcp.json` file in your project root with the same structure.
You can also authenticate with an [API key](/guides/authentication/api-keys) instead of OAuth by adding an `Authorization` header:
```bash theme={null}
claude mcp add --transport http gumnut https://api.gumnut.ai/mcp \
--header "Authorization: Bearer apikey_YOUR_API_KEY"
```
Or in JSON configuration:
```json theme={null}
{
"mcpServers": {
"gumnut": {
"type": "http",
"url": "https://api.gumnut.ai/mcp",
"headers": {
"Authorization": "Bearer apikey_YOUR_API_KEY"
}
}
}
}
```
### Verify Installation
Check that the server is configured:
```bash theme={null}
claude mcp list
```
You can also use the `/mcp` command within Claude Code to see available servers and their tools.
## Cursor
Cursor supports MCP servers through JSON configuration files. When you connect, you'll be prompted to authenticate with your Gumnut account via OAuth.
### Configuration File Location
* **Global** (all projects): `~/.cursor/mcp.json`
* **Project-specific**: `.cursor/mcp.json` in your project root
### Configuration
Create or edit the configuration file:
```json theme={null}
{
"mcpServers": {
"gumnut": {
"url": "https://api.gumnut.ai/mcp",
"transport": "http"
}
}
}
```
### Using Cursor Settings UI
1. Open Cursor and go to **File > Preferences > Cursor Settings**
2. Select the **MCP** tab
3. Click **Add Server**
4. Enter the server details:
* Name: `gumnut`
* URL: `https://api.gumnut.ai/mcp`
* Transport: `http`
You can also authenticate with an [API key](/guides/authentication/api-keys) instead of OAuth by adding an `Authorization` header to the configuration:
```json theme={null}
{
"mcpServers": {
"gumnut": {
"url": "https://api.gumnut.ai/mcp",
"transport": "http",
"headers": {
"Authorization": "Bearer apikey_YOUR_API_KEY"
}
}
}
}
```
### Verify Installation
After configuration, go to **Cursor Settings > MCP** to see `gumnut` listed as a registered server. Click refresh if needed.
## Claude Web (claude.ai)
Claude on the web supports remote MCP servers through the Integrations feature.
MCP integrations on Claude.ai require a paid plan (Pro, Max, Team, or Enterprise). Free accounts cannot connect to MCP servers—use [Claude Code](#claude-code) or [Claude Desktop](https://claude.ai/download) instead.
### Setup Steps
1. Go to [claude.ai](https://claude.ai) and sign in
2. Click **Customize** then **Connectors** (or go directly to [claude.ai/customize/connectors](https://claude.ai/customize/connectors))
3. Click **+** to add a new connector
4. Enter the Gumnut MCP server URL:
```
https://api.gumnut.ai/mcp
```
5. You'll be prompted to authenticate with your Gumnut account via OAuth
6. Save the connector
### Using the Integration
Once configured, you can ask Claude to interact with your Gumnut library directly in chat:
```
"Show me all my photo albums"
"Find photos from last month"
"Create an album called 'Favorites'"
```
## ChatGPT
ChatGPT supports MCP servers through custom apps.
Gumnut will be added to the ChatGPT app store in the near future. In the meantime, you can connect manually using developer mode.
### Setup Steps
1. Open ChatGPT and go to **Settings > Apps** (or go directly to [chatgpt.com/#settings/Connectors](https://chatgpt.com/#settings/Connectors))
2. Enable **Developer mode**
3. Click **Create app**
4. Configure the app:
* Name: `Gumnut`
* Server URL: `https://api.gumnut.ai/mcp`
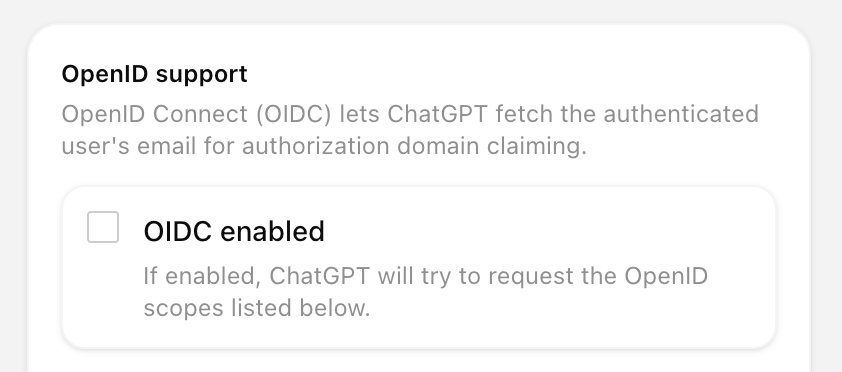
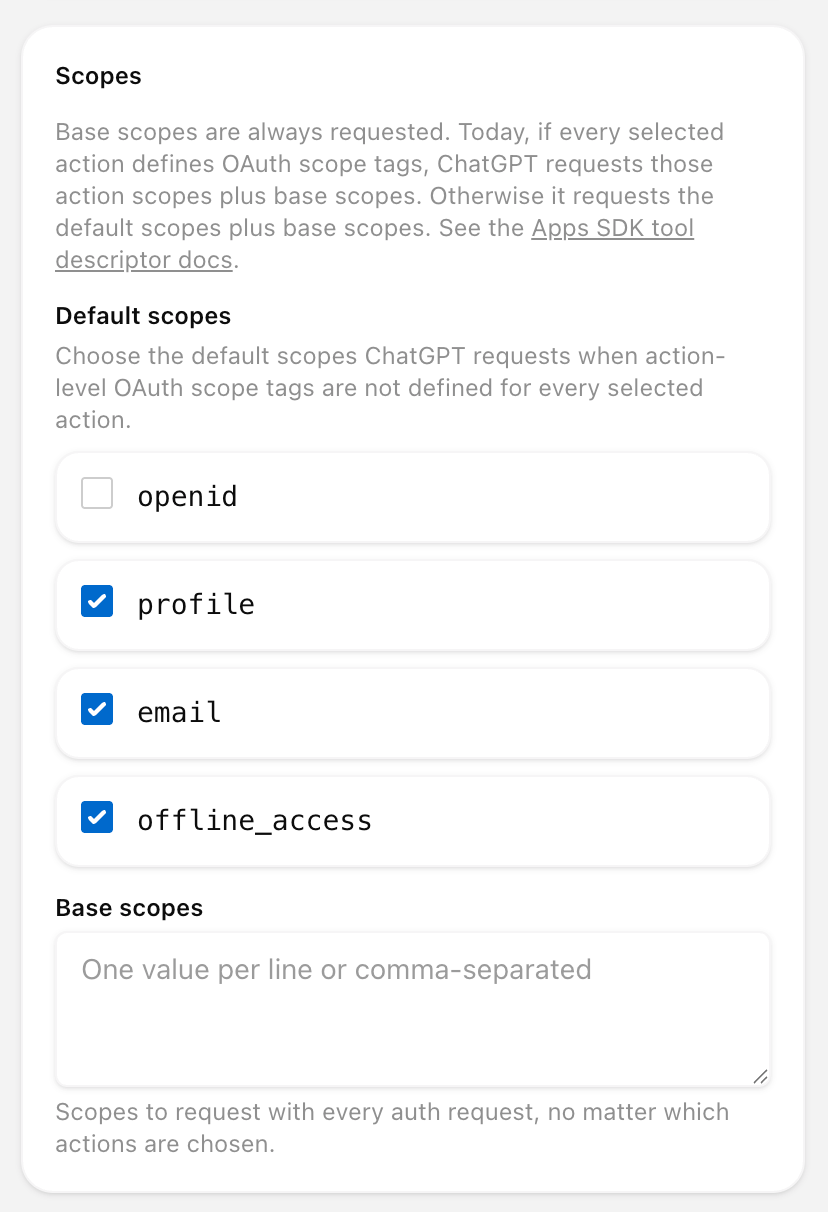
5. Expand **Advanced settings**. Under **OpenID support**, leave **OIDC enabled** unchecked, and under **Default scopes**, make sure `openid` is not selected (`profile`, `email`, and `offline_access` can stay selected).
This step is required. With **OIDC enabled**, ChatGPT requests the `openid` scope during sign-in — but its connector is registered without that scope, so Gumnut's authorization server rejects the request and you'll see **"There was a problem connecting Gumnut Photos. Try again later."** Leaving **OIDC enabled** unchecked stops ChatGPT from requesting `openid`, avoiding the mismatch.
 6. You'll be prompted to authenticate with your Gumnut account via OAuth
7. Save the app
### Using Gumnut in ChatGPT
Once configured, you can ask ChatGPT to interact with your Gumnut photo library directly in chat.
## Local and self-hosted models
You can use Gumnut with a model running on your own hardware:
* The **model** generates the responses. It can run locally or in the cloud.
* The **MCP client** is the app that connects to Gumnut and calls its tools on the model's behalf.
Gumnut's MCP server is cloud-hosted either way. Running the model locally doesn't move your library or the API onto your machine — the client still reaches out to `https://api.gumnut.ai/mcp` over the network, and still authenticates as your Gumnut account.
How you connect depends on which layers your local setup covers:
* **Apps that run models *and* act as an MCP client**, such as [LM Studio](https://lmstudio.ai/docs/app/mcp), need nothing extra from Gumnut. Add the server using the [Any MCP client](#any-mcp-client) instructions and your local model can call Gumnut's tools.
* **Runners that only serve models**, such as [Ollama](https://docs.ollama.com), have no MCP client of their own. Pair one with a separate MCP client and point that client at Gumnut. Ollama, for instance, [documents running Claude Code against a local Ollama instance](https://docs.ollama.com/integrations/claude-code) — from there, follow the [Claude Code](#claude-code) section above.
### What to expect
Gumnut exposes a broad set of tools, and choosing between them is the hard part for a model:
* **Use a tool-calling model with a generous context window.** Smaller models tend to pick the wrong tool, or ignore the tools entirely, as the list grows.
* **Image understanding needs more than a vision model.** For `view_asset` to work, the model has to be vision-capable *and* the client has to pass image results from tools back to the model. Clients that only forward text will leave the assistant working from metadata alone.
* **Interactive [MCP Apps](/guides/mcp/overview#mcp-apps) widgets are client-side.** Clients that don't implement MCP Apps still get every tool — they render the results as text rather than as photo grids and album cards.
## Troubleshooting
Having issues? See the [MCP Troubleshooting guide](/guides/mcp/troubleshooting) for common problems and solutions.
## Next Steps
Once configured, you can interact with your Gumnut photo library through natural language. See the [MCP Overview](/guides/mcp/overview#example-interactions) for example interactions and available operations.
6. You'll be prompted to authenticate with your Gumnut account via OAuth
7. Save the app
### Using Gumnut in ChatGPT
Once configured, you can ask ChatGPT to interact with your Gumnut photo library directly in chat.
## Local and self-hosted models
You can use Gumnut with a model running on your own hardware:
* The **model** generates the responses. It can run locally or in the cloud.
* The **MCP client** is the app that connects to Gumnut and calls its tools on the model's behalf.
Gumnut's MCP server is cloud-hosted either way. Running the model locally doesn't move your library or the API onto your machine — the client still reaches out to `https://api.gumnut.ai/mcp` over the network, and still authenticates as your Gumnut account.
How you connect depends on which layers your local setup covers:
* **Apps that run models *and* act as an MCP client**, such as [LM Studio](https://lmstudio.ai/docs/app/mcp), need nothing extra from Gumnut. Add the server using the [Any MCP client](#any-mcp-client) instructions and your local model can call Gumnut's tools.
* **Runners that only serve models**, such as [Ollama](https://docs.ollama.com), have no MCP client of their own. Pair one with a separate MCP client and point that client at Gumnut. Ollama, for instance, [documents running Claude Code against a local Ollama instance](https://docs.ollama.com/integrations/claude-code) — from there, follow the [Claude Code](#claude-code) section above.
### What to expect
Gumnut exposes a broad set of tools, and choosing between them is the hard part for a model:
* **Use a tool-calling model with a generous context window.** Smaller models tend to pick the wrong tool, or ignore the tools entirely, as the list grows.
* **Image understanding needs more than a vision model.** For `view_asset` to work, the model has to be vision-capable *and* the client has to pass image results from tools back to the model. Clients that only forward text will leave the assistant working from metadata alone.
* **Interactive [MCP Apps](/guides/mcp/overview#mcp-apps) widgets are client-side.** Clients that don't implement MCP Apps still get every tool — they render the results as text rather than as photo grids and album cards.
## Troubleshooting
Having issues? See the [MCP Troubleshooting guide](/guides/mcp/troubleshooting) for common problems and solutions.
## Next Steps
Once configured, you can interact with your Gumnut photo library through natural language. See the [MCP Overview](/guides/mcp/overview#example-interactions) for example interactions and available operations.